Send or Schedule Workbook Exports
Sigma provides a variety of ways to export workbooks and their contents, so that you can share them. You can:
Immediately send an element or workbook to one more destinations:
An email list
Slack channel
Google Cloud Storage from Snowflake connections (Beta)
Amazon S3 from Snowflake connections (Beta)
Set up a scheduled export of an element or workbook to one or more destinations:
An email list
Slack channel
Google sheets
Google drive
Google Cloud Storage from Snowflake connections (Beta)
Amazon S3 from Snowflake connections (Beta)
Immediately send a scheduled export, as it is configured.
The type of exported file depends on the workbook element and/or the destination. See the individual export instructions for what you want to do. Supported types include:
Image
Excel (raw data)
CSV (raw data)
There are file size limits for the various exports. See the individual export instructions and Download, export, and upload limitations.
Note: If you have multiple scheduled exports, it's a best practice to stagger the schedules. Staggering schedules helps to reduce the load on Sigma and on the data warehouse. Admins can refer to the Scheduled Exports page to see all the exports for the organization. For more information see Manage Organization Schedules.
User requirements
The ability to send and schedule workbook exports requires the following:
To send workbook exports on demand, you must be assigned an account type with the Download or Send Now permission enabled.
To schedule a workbook export, you must be assigned an account type with the Schedule export permission enabled.
You must be the workbook owner or be granted Can explore or Can edit workbook permission.
Note: Additional requirements may apply depending on the export destination.
Export destinations
Send or schedule exports (in CSV, Excel, PDF, or image format) to one or more email recipients. For more information, see Export to email.
Slack
Send or schedule Slack notifications containing workbook exports. For more information, including additional organization and account type permission requirements, see Export to Slack.
Google Sheets or Drive
Send or schedule exports to Google Sheets or Google Drive. For more information, including additional account type permission requirements, see Export to Google Sheets or Drive.
Webhook
Send or schedule exports to other applications through webhooks. For more information, including additional account type permission requirements, see Export to webhook.
Cloud storage
Send or schedule large exports to cloud storage (AWS, Azure, or GCP). For more information, including additional organization and account type permission requirements, see Export to cloud storage.
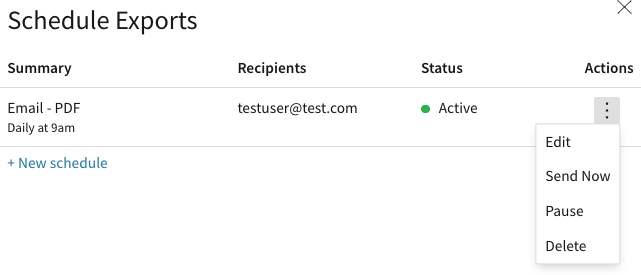
Send a scheduled export at any time
| 1. | From the workbook menu (▼), select Schedule exports. |
| 2. | Click the More menu to the right of the schedule you would like to send. |
| 3. | Click Send Now. |

Edit or delete a schedule
| 1. | From the workbook menu (▼), select Schedule exports. |
Sigma opens the Schedule Exports modal.
| 2. | Click the More menu to the right of the schedule you would like to send. |
| 3. | Click Delete to delete the schedule or Edit to make changes to the schedule. |
Set up a custom delivery schedule
If the default delivery options do not work for your needs, you can set up a custom cron job for delivery time. To enter in the custom cron job, specify the minute, hour, day (month), month and day (week). You can use this tool to help you write the correct cron expression.
To send a report at 1:05 AM on the first Monday of the quarter, you'd enter:
5 1 * 1/3 Mon
To send a report at 1:30 AM on the first of every month, you'd enter:
30 1 1 * *
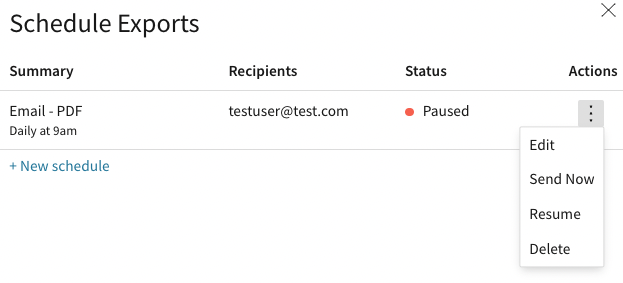
Pause a scheduled export
You can manually pause and resume scheduled exports.
| 1. | From the workbook menu (▼), select Schedule exports. |
| 2. | Sigma opens the Schedule Exports modal. |
| 3. | Click the More menu of the Actions column and select Pause. |

| 4. | In the Status column, the status changes to Paused. |
| 5. | To resume an export, repeat the steps above but choose Resume from the More menu. |
Auto-paused scheduled exports
If a scheduled export fails more than 5 times in 7 days +, and none of the exports succeed, Sigma pauses the export and the user receives an email notification. The email notification contains the following message:
Document export failed. Sigma has paused one of your scheduled exports. Please use the below link to the workbook to check details.
You can manually resume the export. The Status column shows Paused with an exclamation point. To resume the paused export, choose Resume from the More menu in the Actions column.
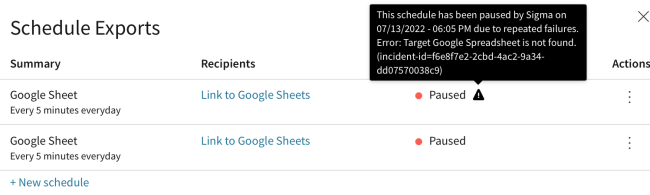
Table and pivot table PDF export formatting
How Sigma handles table and pivot table exports in PDF format depends on whether the workbook is using the legacy layouts or the new grid layouts.
For grid layouts, see Compose elements on a page.
For legacy layouts, see Table and pivot table PDF export formatting (legacy layouts).
Export to email
You can send workbooks, their pages, and individual elements to email recipients on a set schedule or as-needed basis. For example, you can email an executive team member a PDF illustrating the team's KPIs on a regular basis.
A workbook can support multiple schedules, and each email can support multiple attachments, up to the export file size limit. Attachment file type options (PDF, Image, CSV, and Excel) vary by attachment type.
You can select either a published workbook or a tagged version of a workbook to send in email.
If you use email export while in draft mode, or while exploring, the export contains the latest published or tagged version. Changes you make to drafts or explorations cannot be exported to email until you publish them.
Exports only display the data that the recipient has access to based on their permissions. Recipients must be Sigma users.
This document describes how to schedule and send workbook exports using email destinations.
Requirements
-
To use this feature, you must:
-
Be a Creator or Admin or be assigned a custom account type with the appropriate permissions.
-
Have Can Edit or Can Explore access to the individual workbook.
-
-
To send a version-tagged workbook, the version tag must exist and be applied to the workbook. Admins can create a version tag, and workbook creators can tag a version of a workbook. For more information see Version tagging.
Export limits
The size limit for emailed exports is 30MB. This is the total limit for all attachments when combined.
If an export exceeds this limit, the entire export fails and the email's recipient is notified. Schedules that repeatedly exceed this limit are automatically paused and their owner notified.
Export to email as needed
To send an ad hoc email export:
| 1. | Click the workbook header title menu ( |
| 2. | Select Send now. |
Note: This option is only available from a workbook's latest published or tagged version. If the menu item is disabled, the workbook is in Edit mode. Either publish your draft or return to the latest published or tagged version of the workbook before attempting to send an email.
| 3. | The Send Now modal opens, with email as the default destination. |
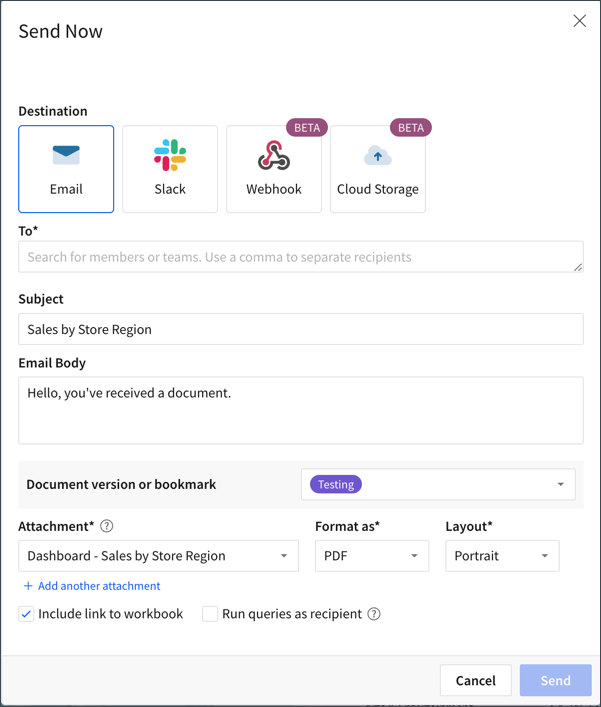
| 4. | In the To field, enter up to 1,000 comma-separated recipient email addresses. |

Note: If export authentication is configured for your organization, you can only send the export to email addresses associated with an authorized domain. When you attempt to send the export, Sigma notifies you if an email address contains a domain that's not allowed.
| 5. | Optional) In the Subject field, enter a subject line. |
| 6. | (Optional) In the Email Body field, enter a message. |
| 7. | If the workbook has versions or bookmarks, select which one you would like to send. |
| 8. | Select one or more attachments from the Attachment menu. The options are: |
Entire workbook exports all the workbook's pages.
By workbook page. Sigma lists all the pages in the workbook. For each page's submenu, you can export the Entire page or select an element on the page.
| 9. | In the Format as dropdown select a file format. |
For an entire workbook, use PDF and choose either a portrait or landscape Layout.
For an individual page, select either PDF or Image.
For an individual element, select either PDF, CSV, Excel, or Image.
Important: CSV and Excel attachments export as raw data.
| 10. | (Optional) To add additional attachments, click + Add another attachment. Then repeat the previous step of these instructions. |
| 11. | (Optional) If you select more than one Excel attachment, Sigma lets you export them together in one Excel file, with each element in its own tab. Select Merge Excel files. |
| 12. | (Optional) By default Sigma includes a link to the workbook in the email body. If you don't want that link to be included, uncheck Include workbook link. |
| 13. | (Optional) By default, exports capture data that's accessible to the export creator. To limit the exports to only display what the recipient has permission to view, select Run queries as recipient. This feature will only work for Sigma users. If the recipient is not a Sigma user and this option is checked then the email will fail to send. The sender of the export will receive a failure notification email that looks like this: |

Note: To run as recipient, each query runs separately per recipient. Larger recipient lists will result in more queries sent to the database and longer processing times.
| 14. | Click Send. |
Schedule an emailed export
Scheduled emails send the latest published version of the workbook, unless you select a tagged version.
To schedule an emailed report:
| 1. | From the workbook header menu ( |
The Schedule Exports modal opens.
| 2. | a. If this is the workbook's first schedule, click Add Schedule. |
b. If one or more schedules already exist, click + New schedule.
A New schedule form opens. The Destination defaults to Email.
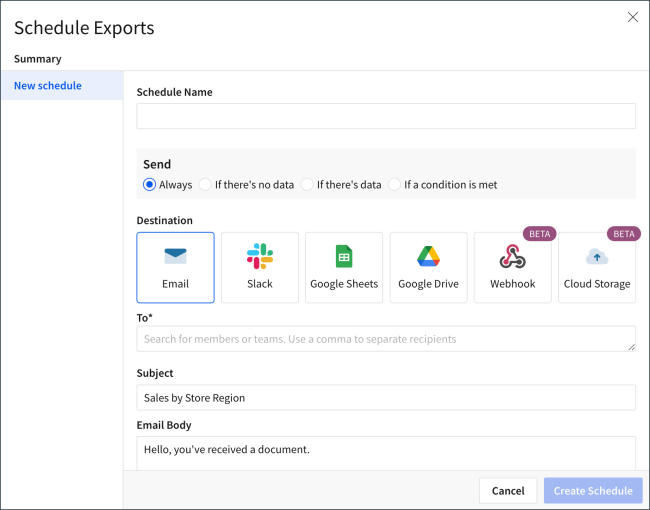
| 3. | Enter a Schedule Name. |
| 4. | In the To field, enter up to 1,000 comma-separated recipient email addresses. |
Note: If export authentication is configured for your organization, you can only send the export to email addresses associated with an authorized domain. When you attempt to create the schedule, Sigma notifies you if an email address contains a domain that'ss not allowed.
| 5. | (Optional) In the Subject field, enter a subject line. |
| 6. | (Optional) In the Email Body field, enter a message. |
| 7. | Scroll down to see the additional options. |
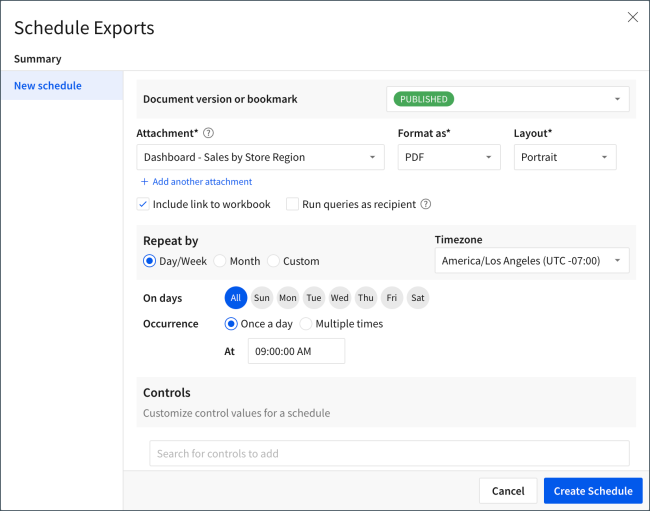
| 8. | If the workbook has versions or bookmarks, select which one you would like to send. |
| 9. | Select one or more attachments from the Attachment menu. The options are: |
Entire workbook exports all the workbook's pages.
By workbook page. Sigma lists all the pages in the workbook. For each page's submenu, you can export the Entire page or select an element or data source on the page.
| 10. | In the Format as dropdown select a file format. |
For an entire workbook, you can either:
Select PDF and choose either a portrait or landscape Layout.
Select Excel.
For an entire individual page, select either PDF, Image, or Excel.
For an individual element, select either PDF, CSV, Excel, or Image.
For a data source, select either PDF, CSV, Excel, PDF, or Image.
Important: CSV and Excel attachments export as raw data.
| 11. | (Optional) To add additional attachments, click + Add another attachment. Then repeat the previous steps 9-10 of these instructions. |
| 12. | (Optional) If you select more than one Excel attachment, Sigma lets you export them together in one Excel file, with each element in its own tab. Select Merge Excel files. |
| 13. | (Optional) By default Sigma includes a link to the workbook in the email body. If you don't want that link to be included, uncheck Include workbook link. |
| 14. | (Optional) By default, exports capture data that's accessible to the export creator. To limit the exports to only display what the recipient has permission to view, select Run queries as recipient. This feature will only work for Sigma users. If the recipient is not a Sigma user and this option is checked then the email will fail to send. The sender of the export will receive a failure notification email that looks like this: |

Note: To run as recipient, each query runs separately per recipient. Larger recipient lists will result in more queries sent to the database and longer processing times.
| 15. | Set the delivery schedule. |
For Repeat by select a schedule option: Day/Week, Month or Custom.
From the Timezone, select a time zone.
Setting a schedule's frequency depends on the Repeat by selection.
Day/Week: pick the schedule's day or days of the week (On days), how often on a day (Occurrence) and time of day (At).
Month: Select the Day of month (1-31) and time (At).
Custom: Enter a raw cron string value. For more information see Set up a custom delivery schedule.
| 16. | (Optional) Select one or more workbook controls to apply to the exported content. For more information see Apply control values to scheduled reports. |
In the search box below Controls, search for and select the control by control ID.
Select the control value(s) to apply to the scheduled export.
Repeat this step to add additional controls.
| 17. | (Optional) You can define conditions for when Sigma sends the export. For more information see Schedule exports using conditions. |
| 18. | Click Create Schedule. |